Eksportowanie trasy
Do wyeksportować pojedynczą trasę, otwórz ekran szczegółów trasa i dotknij ikony eksportu w dolnym pasku narzędzi.
Do wyeksportować wiele tras, najpierw otwórz ekran tras y za pomocą Menu > Trasy > Zapisane trasy. Następnie otwórz ekran wyboru trasa, stukając Więcej > Wybierz. Lub naciśnij długo na trasa, aby otworzyć tryb wyboru. Wybierz żądane trasy i foldery i dotknij ikony eksportu w dolnym pasku narzędzi. Po naciśnięciu ikona eksportu pojawi się wyskakujące okienko eksportu, przykład pokazano poniżej:

Wy skakujące okienko eksportu.
W wyskakującym okienku eksportu możesz wybrać rodzaj danych, które zostaną wyeksportowane po naciśnięciu przycisku eksportu w dolnej części wyskakującego okienka. Rodzaj eksportowanych danych może być dowolną kombinacją następujących elementów:
Geodata: Jeśli dodasz „Geodata”, plik danych zawierający trasę (y) zostanie wyeksportowany. Format pliku jest wyświetlany w podtytule elementu geodanych. W powyższym przykładzie jest to gpx. Jeśli naciśni esz ustawienia, możesz zmienić format danych. Obsługiwane formaty plików do eksportowania trasy to gpx, gpx.zip, kml, kmz, geojson i geojson.zip.
Zdjęcia: Jeśli dodasz „Zdjęcia”, zdjęcia tras (tras) również zostaną wyeksportowane. Ten pozycja nie jest dostępny, jeśli nie ma zdjęć.
Mapa: Jeśli dodasz „Mapę”, mapa trasy zostanie wyeksportowana. Rozmiar pikseli mapy jest wyświetlany w napisach. Możesz zmienić rozmiar piksela i format danych (jpg/png/pdf) w ustawieniach eksportu.
Jeśli dodasz „Mapę” do eksportu, możesz również włączyć opcję „Adnotacja Dodaj mapę” (nie w systemie macOS). Następnie przed udostępnieniem mapy innej aplikacji możesz narysować adnotacje na mapie palcem lub Apple Pencil.
Po wybraniu rodzaju danych, które mają zostać wyeksportowane, możesz nacisnąć „Eksport” w dolnej części wyskakującego okienka eksportu, aby wyeksportować trasę (y). Następnie pojawi się zwykłe wyskakujące okienko iOS, w którym możesz wybrać aplikację do wysłania wyeksportowanych danych. Na przykład iMessage, aby wysłać trasa do znajomego lub aplikację Pliki, aby zapisać trasy w chmurze.
Ustawienia eksportu
W wyskakującym okienku eksportu możesz również zmienić ustawienia eksportu, naciskając przycisk „Ustawienia” w prawo górnym rogu wyskakującego okienka eksportu. Następnie pojawi się następujący ekran:
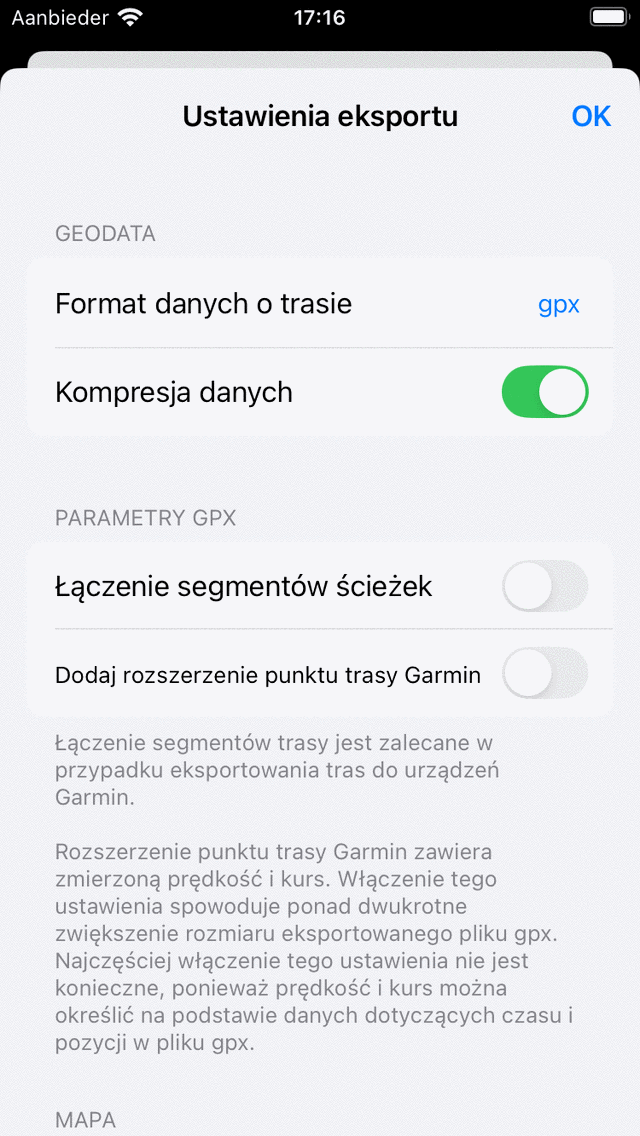
E kran ustawień eksportu trasa.
Pierwsza sekcja w ekranie ustawień eksportu dotyczy danych geodezyjnych. Tutaj możesz ustawić format danych trasa do eksportowania. Stukając „Format danych o trasie”, możesz wybierać między gpx, kml i geojson. Możesz zdecydować, czy chcesz skompresować dane. Jeśli włączysz kompresję, wyeksportowany plik geodanych zostanie skompresowany w formacie zip. Rozmiar pliku będzie znacznie mniejszy niż bez kompresji, dlatego zalecamy włączenie kompresji.
W sekcji gpx możesz zdecydować się na włączenie „Łączenie segmentów ścieżek”. Jest to ważne, jeśli zamierzasz wyeksportować plik GPX planowanej trasa do urządzenia Garmin. Urządzenia Garmin nie mogą prawidłowo importować plików gpx składających się z wielu segmentów ścieżek. Tylko urządzenie Garmin pokaże Ci pierwszy segment. Łącząc segmenty torów z pojedynczym segmentem toru, trasę można poprawnie zaimportować.
Pozostałe sekcje dotyczą mapy (obrazu), którą można wyeksportować. Możesz zdecydować o formacie pliku obrazu mapy (png, jpg lub pdf). Za pomocą suwaków można ustawić żądaną szerokość i wysokość piksela. Również w celu wygenerowania mapy czasami trzeba pobrać kafelki mapy. Możesz określić, czy chcesz zezwolić na pobieranie kafli map komórkowych.
Eksportowanie wszystkich trasy
Do wyeksportować wszystkie trasy przechowywane na urządzeniu, najpierw otwórz ekran tras za pomocą Menu > Trasy > Zapisane trasy. Upewnij się, że filtr nie jest aktywny (przycisk filtra ma niebieską krawędź). Przejdź do folderu tras głównych, aby „Wszystkie trasy” były wyświetlane pod paskiem wyszukiwania. Upewnij się, że pasek wyszukiwania jest pusty. Następnie otwórz ekran wyboru trasa, stukając Więcej > Wybierz. Naciśnij „Wszystko” w lewym top rogu, aby wybrać wszystkie trasy i foldery. Następnie dotknij ikony eksportu dół dolnym pasku narzędzi, aby otworzyć wyskakujące okienko eksportu. Wybierz rodzaj danych do wyeksportowania w wyskakującym okienku eksportu i naciśnij „Eksport”.