Planowanie trasy
Planowanie trasa polega na tworzeniu trasa między dwiema lub więcej lokalizacjami. Lokalizacje te nazywane są punkty trasa w Topo GPS. punkty trasa muszą być tworzone ręcznie, naciskając długie naciśnięcie mapy. alternatywa planowania trasa jest generowanie tras. Przy generowaniu trasa nie musisz tworzyć punkty trasa, ale wystarczy podać punkt początkowy i żądaną długość.
Planer trasa można otworzyć, otwierając najpierw pop-pup tras y (Menu > Trasy). Następnie dotknij elementu „Zaplanuj trasę”. W systemie macOS dotknij selektora trybu „Plan” u top okna lub Command-K). Przykład ekranu planowania trasa jest pokazany poniżej:
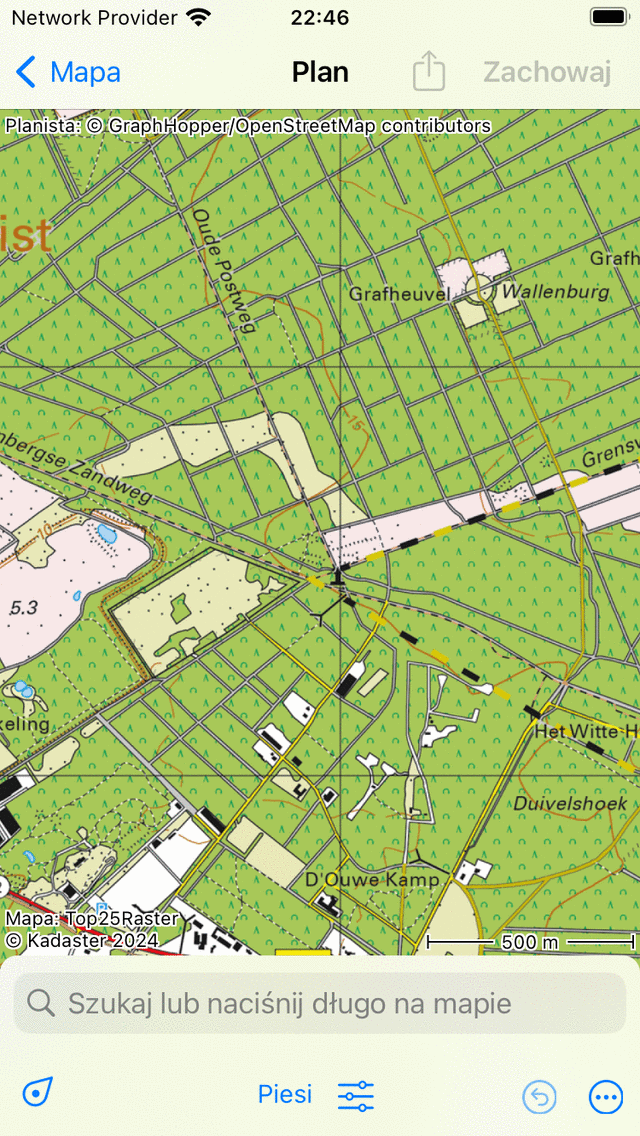
Planer trasa bez planowanej trasa.
Na ekranie planowania trasa można znaleźć nakładkę. W tej nakładce wyświetlany jest przycisk środków transportu i istnieje kilka innych przycisków, których można użyć do sterowania planerem trasa.
Aby powiększyć mapę do swojej lokalizacji, możesz dotknąć przycisku położenia w lewym dolnym rogu nakładki.
Do cofnąć akcję, należy nacisnąć przycisk „Undo” (okrąg ze strzałką zwrotną) w nakładce. Możesz cofnąć wszystkie działania w planerze, dopóki przycisk cofania nie stanie się jasnoniebieski.
Następny przycisku cofania znajduje się przycisk więcej (okrąg z punktami, tylko iOS). Jeśli dotkniesz przycisku więcej, pojawi się menu z następującymi opcjami:
Mapa zmian: Możesz zmienić mapę planera za pomocą tej opcji.
Dodaj tras ę: Można to wykorzystać do dołączenia zapisanej trasa do planowanej trasa lub do dodania zapisanej trasa do mapy.
Szukaj: Za pomocą tej opcji możesz utworzyć punkt trasa, wprowadzając nazwę lokalizacji.
Reset owanie: spowoduje to zresetowanie planowania trasa. Planowana trasa i punkty trasa znikną.
Jeśli planowana jest trasa, na nakładce pojawi się okrąg z krzyżem. Jeśli naciśniesz ten przycisk, zresetujesz planer trasa. Stukając przycisk cofania, możesz cofnąć akcję resetowania.
Do zapisać planowaną trasę, musisz nacisnąć przycisk „Zapisz” w prawym górnym rogu ekranu. Do udostępnić zaplanowany trasa, możesz dotknąć ikony eksportu po lewa stronie przycisku Zapisz.
W ustawieniach Topo GPS możesz zmodyfikować styl planowanej linii trasa.
Więcej informacji na temat planowania trasa można uzyskać, naciskając „Planer: Copyright” w lewym górnym rogu ekranu planowania trasa.
Środki transportu
Do zaplanować trasę, najpierw sprawdź bież ące środki transportu w nakładce. W powyższym przykładzie jest ustawiony na „Piesi”. Po dotknięciu „Piesi” pojawi w ekran, na którym możesz zmienić środki transportu.
Po prawej stronie przycisku środków transportu znajduje się ikona ustawień. Jeśli dotkniesz tej ikona, możesz precyzyjnie dostroić zachowanie środków transportu. W zależności od ustawień trasa zostanie zoptymalizowana. Włączenie którejkolwiek z tych opcji może w dłuższą trasa.
Jeśli planujesz trasę ze środkiem transportu „Lot wron” lub używając warstwy, możesz to zrobić bez połączenia z Internetem. W przypadku innych środków transportu wymagane jest połączenie internetowe, ponieważ trasy są obliczane zewnętrznie.
Więcej informacji można znaleźć w dziale Środki transportu.
Dodawanie punktów trasa
Do zaplanować trasę, musisz dodać punkty trasa. punkty trasa można dodawać w trzy sposoby:
Naciskając długie naciśnięcie mapy i przeciągając ikona w żądane miejsce. Jeśli używasz systemu macOS, możesz również umieścić wskaźnik w żądanej lokalizacji i nacisnąć Command-A.
Wprowadzając lokalizację w pasku wyszukiwania nakładki planera trasa.
Stukając punkty trasy, znacznik położenia lub węzły z sieci węzłów.
Jeśli dodano co najmniej dwa punkty trasa, trasa zostanie obliczona między dwoma punktami trasa. Następnie możesz dodać inne punkty trasa.
Poniżej omówiono kilka przykładów planowania trasy.
Planowanie trasa wykończeniowej
Jeśli jesteś gotowy do planowania trasa, możesz wrócić do głównej mapy, dotykając „< Mapa” w lewym górnym rogu ekranu. Planowana trasa zostanie następnie pokazana w mapie na ekranie głównym, ale nie zostanie zapisana. Jeśli dotkniesz zaplanowany trasa na ekranie głównym, powrócisz do planera trasa.
Zapisywanie zaplanowany trasa
Jeśli chcesz zapisać planowaną trasę, dotknij „Zapisz” w prawo górnym rogu ekranu planowania trasa. Pojawi się ekran, na którym możesz wprowadzić szczegóły trasa, jak pokazano poniżej:
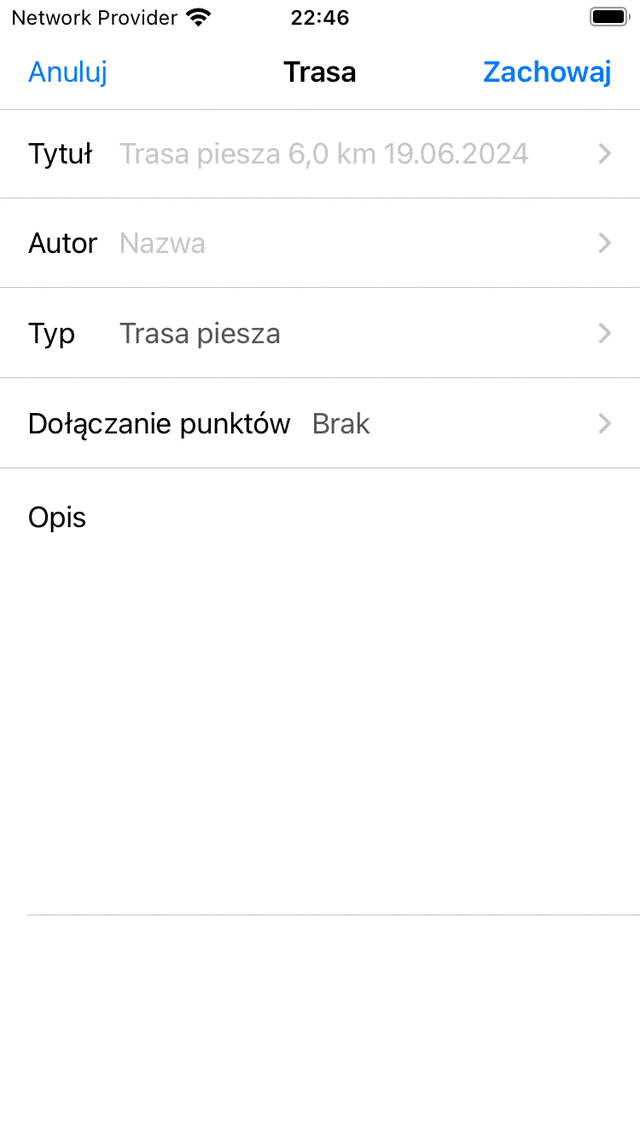
Zapis ywanie zaplanowany trasa
Możesz wprowadzić tytuł, autora, typ trasa i opis. Szary symbol zastępczy tytułu w polu tytułu jest sugerowanym tytułem i zostanie użyty, jeśli nie wprowadzisz tytułu. Jeśli dotkniesz końca sugerowanego tytułu, możesz zmodyfikować sugerowany tytuł. Możesz także zdecydować o włączeniu punkty, które są aktualnie załadowane na mapie w trasa. Następnie dotknij „Zapisz”, aby zapisać zaplanowany trasa. Wrócisz do ekranu głównego, a mapa zostanie powiększona planowaną trasa.