Rejestrowanie trasy
Podczas rejestrowania trasa zbierane są wszystkie odwiedzane lokalizacje. Po zakończeniu nagrywania możesz zapisać lokalizacje jako trasę.
Aby nagrać trasę, upewnij się, że Topo GPS ma dostęp do Twojej dokładnej Lokalizacja podczas korzystania z aplikacji w Ustawienia iOS > Prywatność> Usługi lokalizacyjne> Topo GPS.
Rozpoczęcie nagrania
Do rozpocząć nagrywanie trasa, musisz otworzyć wyskakujące okienko tras y (Menu > Trasy) i dotknąć pozycja „Nagraj trasę”. Pojawi się wyskakujące okienko, w którym zostaniesz zapytany, czy chcesz rozpocząć nagrywanie, jak w poniższym przykładzie:
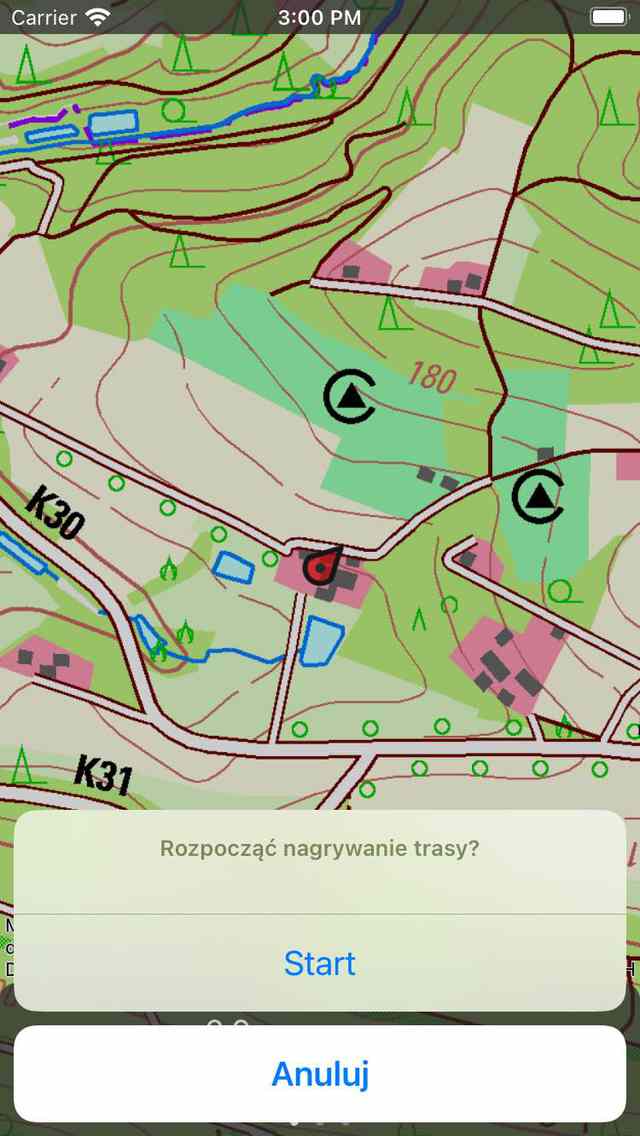
Roz poczęcie nagrywania trasa.
Jeśli dotkniesz „Start” w wyskakującym okienku, nagrywanie trasa zostanie rozpoczęte.
Alternatywnie możesz również rozpocząć nagrywanie trasa z ekranu głów nego, dotykając timera nag rywania na desce rozdzielczej.
Nagrywanie Trasa nagrywania
Jeśli rozpoczęłeś nagrywanie, zobaczysz, że czerwona linia pojawi się na mapie, jeśli się poruszasz. Ta czerwona linia wskazuje twój ruch. Przykład jest wyświetlany w poniższym rysunku:
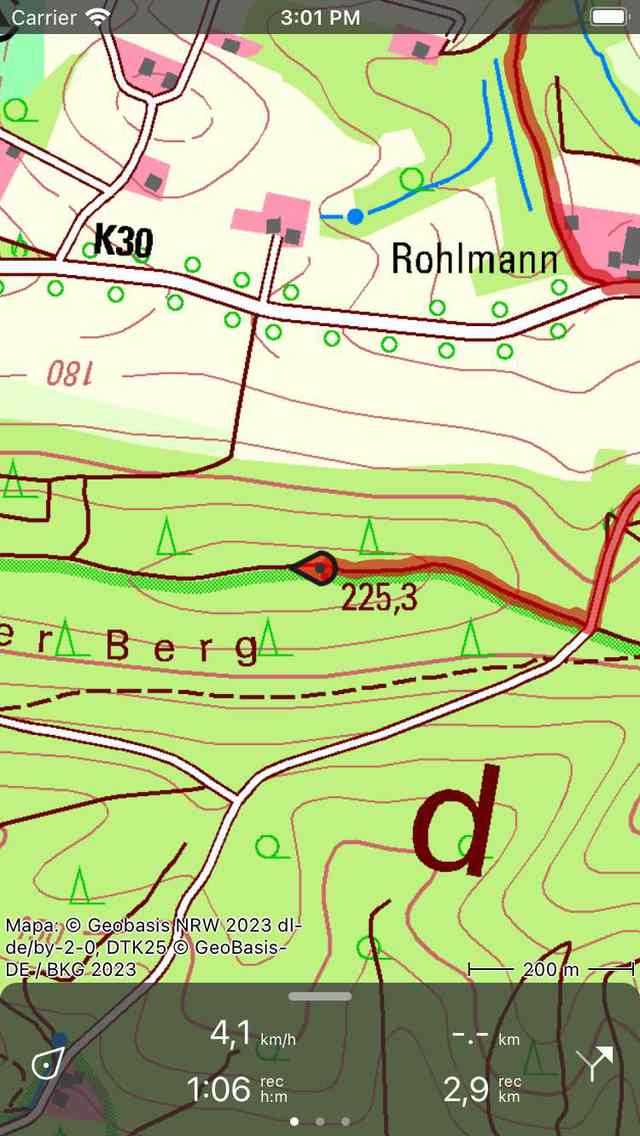
Nag rywanie trasa. Czerwona linia wskazuje twój ruch.
Z egar nag rywania na desce rozdzielczej wskazuje czas trwania bieżącego nagrywania. Na powyższym rysunku jest to 1h06m. Jeśli dotkniesz timera, możesz zako ńczyć nagrywanie.
Mi ernik odległości rekord u na desce rozdzielczej wskazuje długość zarejestrowanej trasa. W powyższym przykładzie jest to 2,9 km. Jeśli dotkniesz miernika odległości rekordu, mapa zostanie powiększona do zarejestrowanej trasa.
Kolor, szerokość i przezroczystość Linia zapisu rekordu można zmodyfikować za pomocą Menu > Więcej > Ustawienia > Style > Linia rekord u.
Podczas nagrywania możesz bezpiecznie zablokować urządzenie lub przełączyć się na inną aplikację. Nie spowoduje to przerwania nagrywania. W górnej części ekranu widać, że Topo GPS używa Twojej lokalizacji w tle. W niektórych urządzeniach zegar ma niebieskie tło, na innych urządzeniach cały pasek stanu zmienia kolor na niebieski. Jeśli dotkniesz niebieskiego zegara lub niebieskiego paska stanu, wrócisz do Topo GPS.
Jeśli dotkniesz linii zarejestrowanej trasa na głównej mapie, zostanie otwarty ekran rekordu. Możesz wyświetlić profil wysokości i prędkości na żywo. Możesz dotknąć tych profili, aby wyświetlić je bardziej szczegółowo.
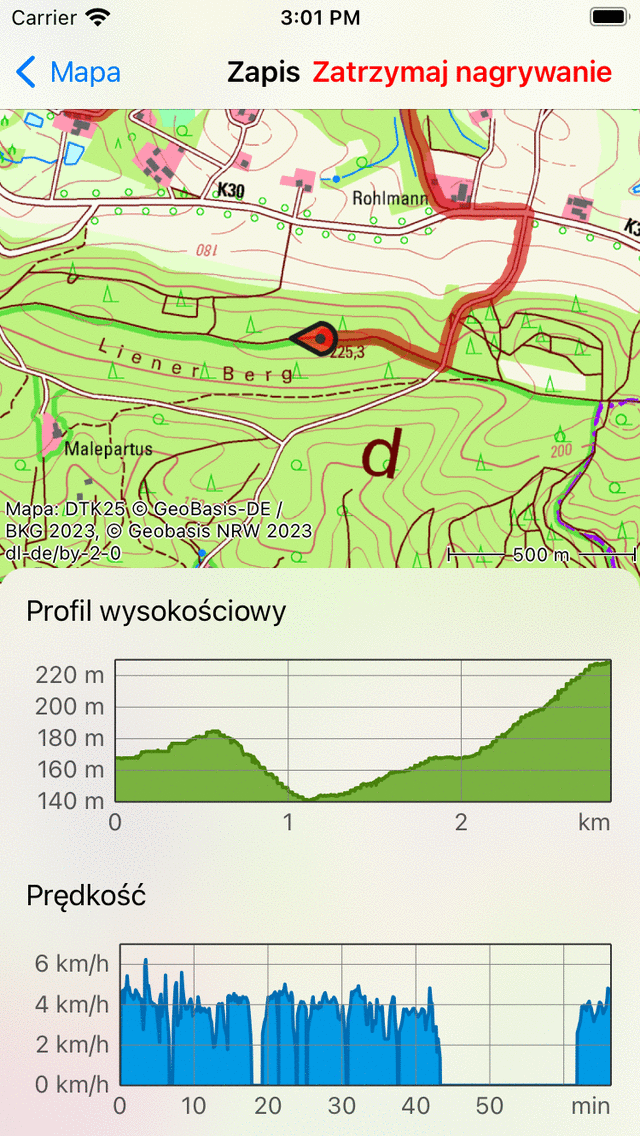
E kran nagrywania trasa z profilami wysokości i prędkości na żywo.
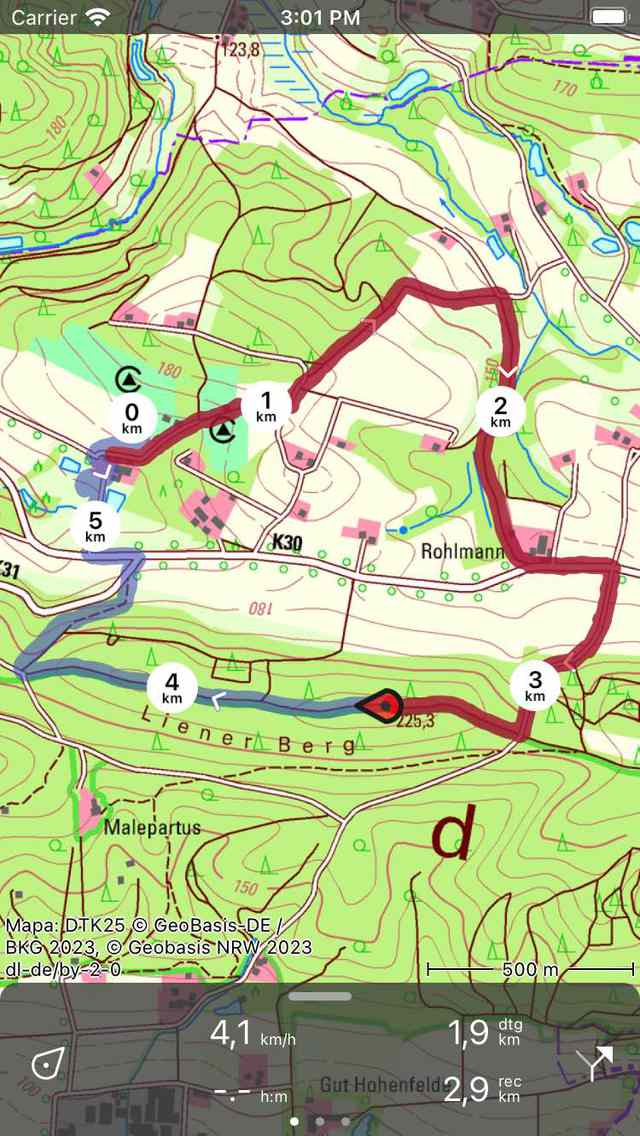
Jeśli załadow ałeś jedną lub więcej trasy na mapie, możesz zarejestrować trasę w tym samym czasie. Przykład pokazano poniżej:
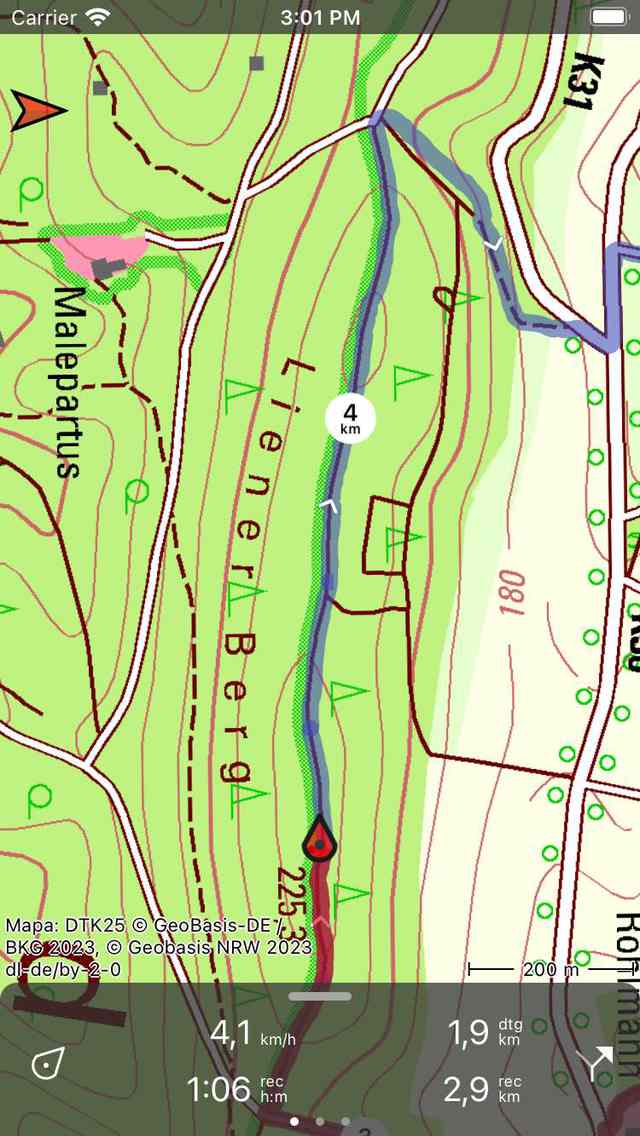
Nag rywanie i pokazywanie trasa.
Na desce rozdzielczej wyświetlany jest symbol „dtg”, jest to odległość do końca niebieskiej trasa, która w powyższym przykładzie wynosi 1,9 km. Symbol „rec” na desce rozdzielczej wskazuje długość zarejestrowanej trasa, która w powyższym przykładzie wynosi 2,9 km. Jeśli dotkniesz symbolu „rec”, mapa zostanie powiększona do zarejestrowanej trasa. Jeśli dotkniesz symbolu „dtg”, mapa zostanie powiększona do niebieskiej trasa.
Podczas nagrywania trasa co sekundę Twoja lokalizacja jest określana w możliwie najdokładniejszy sposób.
Wykorzystanie baterii
Rejestracja trasa będzie kosztować znaczną ilość energii. Dlatego regularnie sprawdzaj poziom naładowania baterii podczas nagrywania, aby upewnić się, że urządzenie nie kończy z zasilania. Wstrzy maj lub zakoń cz nagrywanie, gdy nie jesteś już w ruchu. Na typowym nowoczesnym urządzeniu z systemem iOS nagrywanie kosztuje około 6-8% baterii na godzinę. Dzięki pełnej dobra jakość baterii można nagrać podróż trwającą do 10 - 12 godzin. Aby uzyskać dłuższe nagrania, musisz naładować baterię, na przykład za pomocą powerbanku.
Ilość zużycia baterii zależy naprawdę od jakości i wielkości baterii oraz od innych rzeczy, które robisz podczas nagrywania. Wyłączenie ekranu może mieć znaczną różnica. Możesz także włączyć przełącznik „Osłona kamery” w sekcji Wyłączanie wyświetlacza ustawi eń.
Jeśli zapisano zarejestrowaną trasę, możesz sprawdzić ilość zużytego procentu baterii na ekranie dodatkowych szczegółów trasa. Do otworzyć dodatkowe szczegóły trasa, otwórz ekran szczegółów trasa, a następnie dotknij sekcji tytułowej tuż pod mapą.
Zakończenie nagrywania
Nagrywanie trasa można zakończyć, naciskając przycisk trasa lub Menu > Trasy, aby otworzyć wyskakujące okienko trasy. Następnie dotknij „Zatrzymaj nagrywanie”. Alternatywnie dotknij timera nagrywania na desce rozdzielczej lub dotknij „Zatrzymaj nagrywanie” na ekranie nagrywania. Ekran nagrywania można otworzyć, dotykając linii zarejestrowanej trasa na mapie.
Pojawi się wyskakujące okienko z prośbą o zatrzymanie nagrywania, jak w poniższym przykładzie:
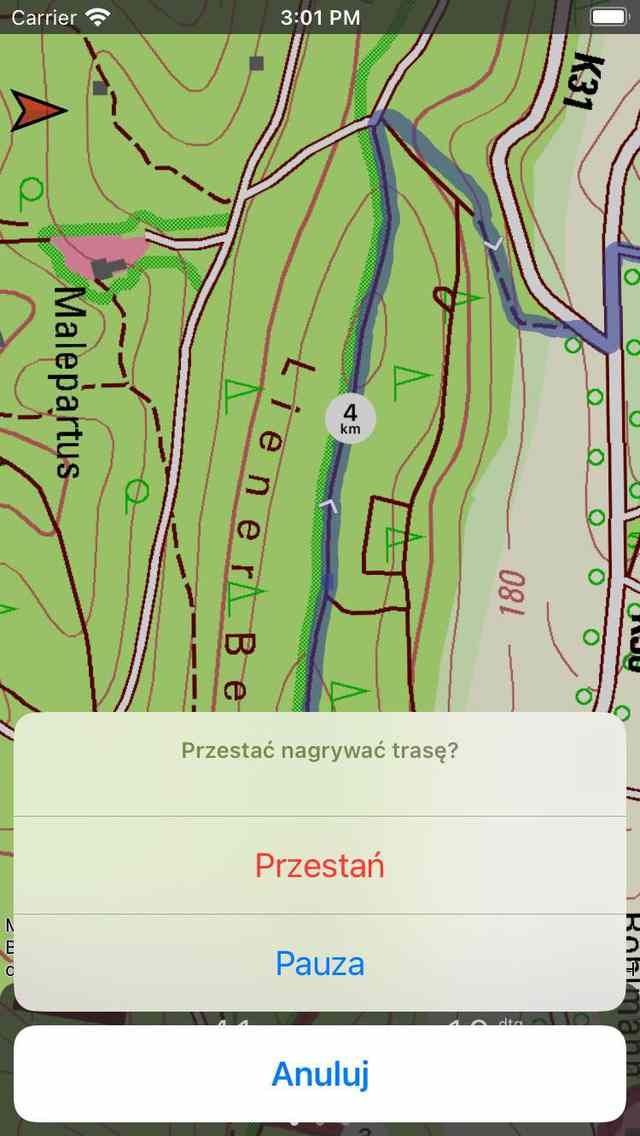
Zako ńczenie nagrywania trasa.
Jeśli naciśniesz „Zatrzymaj” nagrywanie zostanie zakończone i pojawi się ekran, w którym możesz zapisać nagraną trasa.
Wstrzymaj nagrywanie
Jeśli naciśniesz „Wstrzymaj” w wyskakującym okienku, które pojawia się po zakończeniu nagrywania trasa, nagranie zostanie wstrzymane.
Timer nagry wania na desce rozdzielczej zostanie ustawiony na „–: –” podczas przerwy. Mi ernik odległości rekord u pokaże zarejestrowaną odległość, jak widać poniżej:
Nagrywanie trasa zostało wstrzymane, co widać z zegara rekordu i miernika odległości rekordu.
Ponownie uruchomić nagrywanie
Do wznowić wstrzymane nagrywanie, dotknij timera nag rywania lub przycisku „Wznów nagrywanie” w górnej części ekranu nagrywania. Pojawi się następujące wyskakujące okienko:

Wznowienie nagrywania trasa.
Jeśli naciśniesz „Wznów”, nagrywanie będzie kontynuowane. Jeśli naciśniesz „Zatrzymaj”, nagrywanie trasa zostanie zakończone i otrzymasz możliwość zapisania nagranej trasa.
Zapisywanie nagrania
Jeśli zatrzymałeś nagrywanie trasa, pojawi się ekran, w którym możesz zapisać nagraną trasa. Przykład jest wyświetlany poniżej:
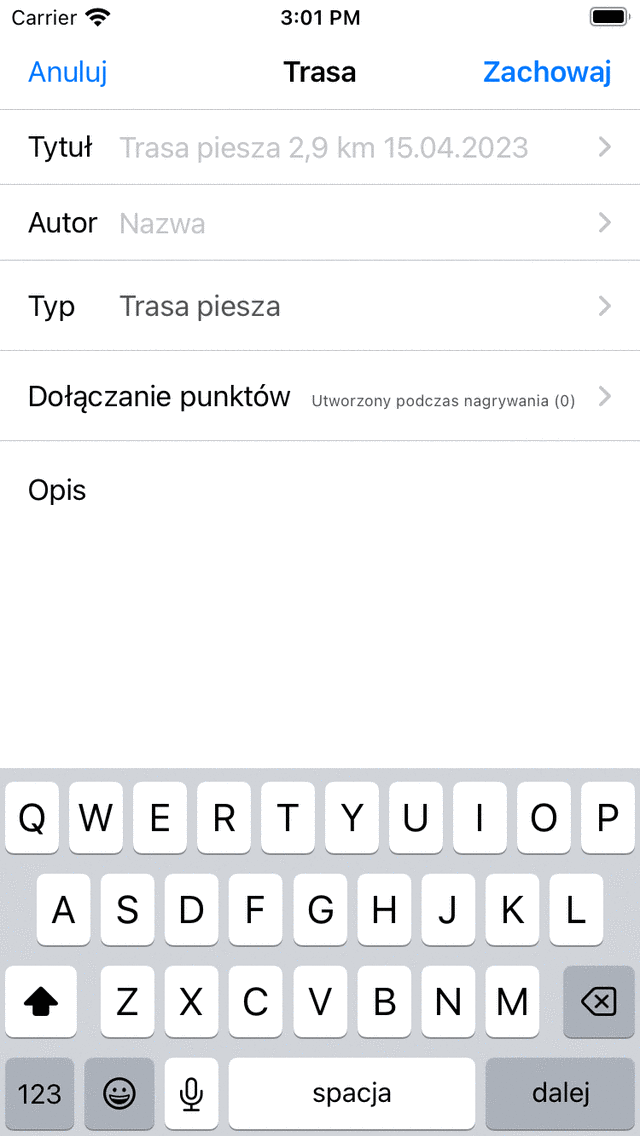
Zap isywanie nagranej trasa.
Na tym ekranie możesz następnie wprowadzić tytuł, autora i opis.
Na podstawie punktu początkowego i końcowego trasa zostanie dokonana automatyczna propozycja tytułu trasa. Ta sugestia pojawia się w polu tytułu, jeśli sam nie wprowadzasz tytułu. Jeśli nie wprowadzisz tytułu, sugestia zostanie użyta podczas zapisywania trasa. Jeśli dotkniesz końca sugerowanego tytułu, możesz zmodyfikować sugerowany tytuł.
Do upewnić się, że automatyczne sugestie tytułu działają poprawnie, w ustawieniach należy włączyć opcję „Adresy - Znajdź automatycznie”.</ref>
Jeśli naciśniesz „>” po prawej stronie tytułu, możesz dodać adres URL.
Jeśli naciśniesz „>” po prawej stronie autora, możesz dodać dane kontaktowe oraz dane dotyczące praw autorskich i licencji. W przypadku zapisania trasa również dane autora i praw autorskich zostaną zapisane do wykorzystania w przyszłości. Jeśli zarejestrujesz lub planujesz nową trasa, ten sam autor i dane dotyczące praw autorskich zostaną już wypełnione. Dlatego nie musisz ponownie wprowadzać tych danych podczas zapisywania następnej zarejestrowanej trasa.
Typ trasa można zmienić, naciskając pole Typ trasa. W przypadku zapisania trasa bieżący typ trasa zostanie użyty jako sugestia typu trasa dla następnej zapisanej trasa. Jeśli na przykład rejestrujesz tylko trasy rowerowe, musisz ustawić typ trasa tylko raz.
Za pomocą ustawienia „Uwzględnij punkty trasa” możesz określić, które punkty trasy, które są aktualnie wyświetlane na mapie ekranu głównego, zostaną uwzględnione w zapisanej trasie. Stukając to ustawienie, możesz wybierać między: wszystkimi punkty trasa znajdującymi się na mapie, punkty trasy w pobliżu trasy, punkty trasy utworzonymi podczas nagrywania i brakiem punkty trasy. Liczba między nawiasami wskazuje liczbę punktów trasy, które mają zostać uwzględnione. Zalecamy ustawienie „Uwzględnij punkty trasy” jako „punkty trasy utworzone podczas nagrywania”. Następnie do trasa zostaną dodane tylko punkty trasy, które są załadowane na mapie i utworzone podczas nagrywania. Zapewnia to brak nieistotnych punkty trasa, które na przykład zdjęcia z innego dnia są dodawane do trasy. Jeśli wybierzesz „punkty trasa w pobliżu trasa”, możesz określić maksymalną odległość punkty trasy od trasy. Zachowaj ostrożność, ustawiając wartość na „Wszystkie punkty trasy”. Może to spowodować dodanie punkty trasa, które są dalekie i dlatego nie mają znaczenia dla zapisanej trasy.
Jeśli skończysz, możesz nacisnąć „Zapisz” w prawo górnym rogu, aby zapisać nagraną trasa. Jeśli nie chcesz zapisywać trasa, możesz nacisnąć „Anuluj” w lewym górnym rogu.
Trasa zostanie zapisana w folderze, który jest aktualnie otwarty na ekranie zapisanych trasy.
Po zapisaniu nagranej trasa pojawi się wyskakujące okienko z pytaniem, czy chcesz udostępnić trasę Topo GPS lub innej aplikacji (w tym celu dotknij „Więcej”). Jeśli nie chcesz udostępniać nagranej trasa, możesz dotknąć „Anuluj”.
Jeśli wybierzesz Topo GPS, możesz udostępnić swoją trasę innym użytkownikom Topo GPS, aby mogli importować zarejest rowaną trasa.
Możliwe jest również udostępnienie zarejestrowanej trasa później.
Natychmiast po zapisaniu tr asa zostanie wyświetlony ekran szczegółów trasa. Tutaj możesz przeglądać i edytować szczegóły trasa oraz załadować zarejestrowaną trasę na mapie, dotykając przycisku mapy w prawo górnym rogu tego ekranu.
Możesz także załadować zarejestrowaną trasę na mapie w późniejszym czasie.