Exporting routes
To export a single route, open the route details screen and tap the share icon in the top of the screen.
To export multiple routes, first open the routes screen via Menu > Routes > Saved routes. Then open the route selection screen by tapping More > Select. Or press long on on a route to open the selection mode. Select the desired routes and folders and tap the share icon in the top bar. After pressing the share icon the export pop-up will appear, an example is shown below:
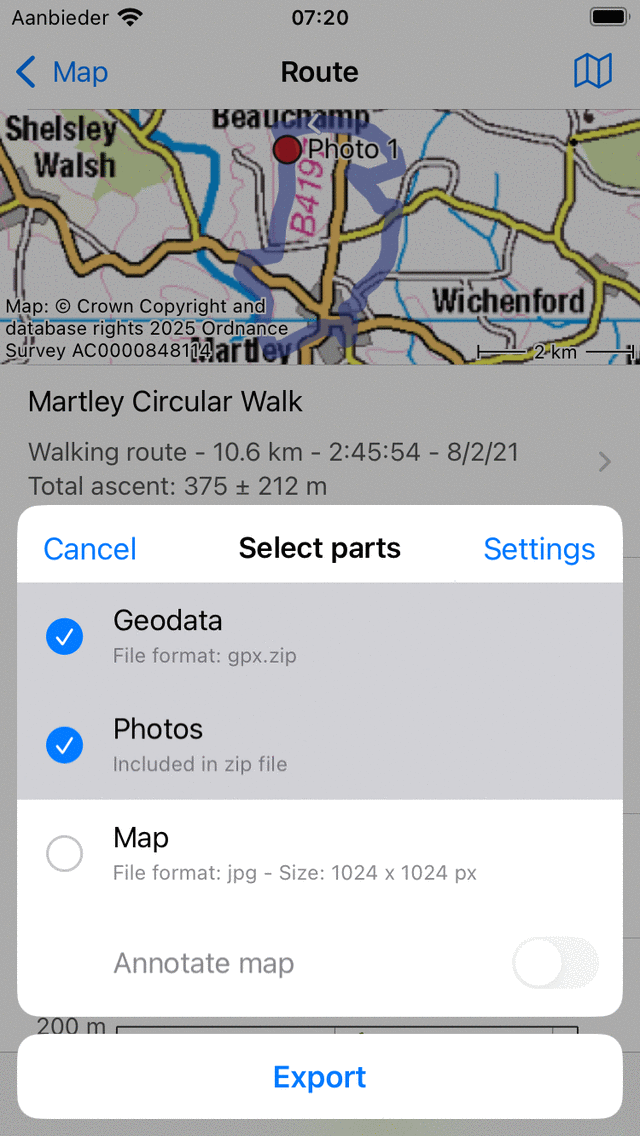
The export pop-up.
In the export pop-up you can select the kind of data that will be exported when pressing the export button in the bottom of the pop-up. The kind of exported data can be any combination of the following:
Geodata: If you include ‘Geodata’ a data file containing the route(s) will be exported. The file format is shown in the subtitle of the geodata item. In the example above it is gpx. If you press settings you can change the data format. Supported file formats for exporting routes are gpx, gpx.zip, kml, and kmz.
Photos: If you include ‘Photos’ the photos of the routes(s) will be exported as well. This item is not available if their are no photos.
Map: If you include ‘Map’ a map of the routes(s) will be exported. The pixel size of the map is displayed in the subtitle. You can change the pixel size and the data format (jpg/png/pdf) in the export settings.
After you have selected the kind of data to be exported you can press ‘Export’ in the bottom of the export pop-up to export the route(s). Then a regular Android share pop-up will show up in which you can pick an app to send the exported data to. Sometimes not all apps are shown in the share pop-up. Then you could try to tap ‘Open in other app’ instead of ‘Export’.
Export settings
In the export pop-up you can also change the export settings by pressing the ‘Settings’ button on the top right of the export pop-up. Then the following screen will appear:
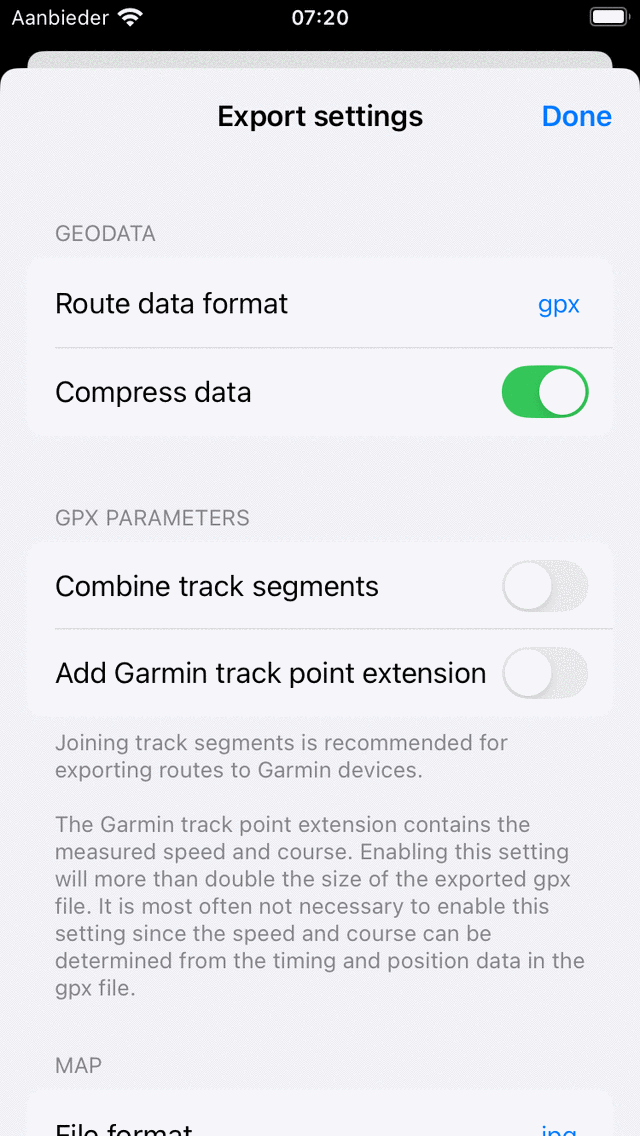
The route export settings screen.
The first section in the export settings screen is about geodata. Here you can set the data format of the to be exported route(s). By tapping ‘Route data format’ you can choose between gpx, kml, and geojson. You can decide whether you want to compress the data. If you enable compression the exported geodata file will be zip compressed. The file size will be much smaller than without compression, therefore we recommend you to enable compression.
In the gpx section you can decide to enable ‘Joining track segments’. This is important if you intend to export the gpx of a planned route to a Garmin device. The Garmin devices cannot properly import gpx files consisting of multiple track segments. A Garmin device only will show you the first segment. By joining the tracksegments to a single tracksegment the route can be imported correctly.
The remaining sections deal with the map (image) that can be exported. You can decide the file format of the map image (png, jpg, or pdf). You can set the desired pixel width and height with the sliders. Also to generate a map sometimes map tiles need to be downloaded. You can determine if you want to allow cellular downloads of map tiles.
Exporting all routes
To export all routes stored on your device, first open the routes screen via Menu > Routes > Saved routes. Then tap the more icon on the top right of the screen and select ‘Export all’. Then all routes will be exported to a gpx.zip file. You can store this file on a cloud storage like Google Drive or OneDrive as a backup, or to transfer your routes to another device.