Layers
A layer is a collection of geographical information that can be added to the map. Layers can be added to the map via the layers screen (Menu > Layers).
The layers screen shows a list of available layers, an example is shown below:
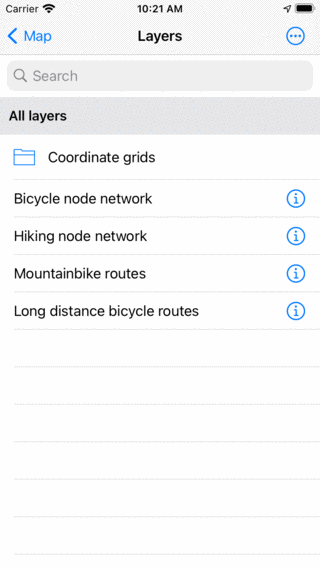
The layers screen (Menu > Layers).
Layers that have grey background are currently loaded on the map. If you tap an item without a grey background it will be loaded on the map and you will return to the main screen. If you tap a layer with a grey background it will be removed from the map. To remove all layers, tap ‘More > Remove all from map’ in the layers screen.
In the layers screen you can always access the coordinate grid layers. Optionally you can purchase a special layer, like the bicycle node network or the mountainbike routes layer. It is also possible to import geodata as layers in wsf, kml/kmz, and geojson format.
Creating a layer from routes
It is possible to create a new layer from your saved routes. Go to the saved routes screen (Menu > Routes > Saved routes). Then tap ‘More > Select’ to enter the selection screen. Select the desired routes and/or folders and tap in the bottom of the screen on the more icon. Then choose ‘Save as layer’.
A new pop-up will appear. Here you can choose the title of the route layer. You can decide to include the waypoints of the routes using a toggle. The default color of the route lines can be set. If you enable the toggle ‘Override route line styles’, the possibly customly set route line styles are ignored, and the default color is used for all routes. If you give the default color a bit transparancy you can easily see the points which were visited more often, as they will become darker. If you tap ‘Save’ in this pop-up the layer is created. All selected routes are copied into this layer.
The saved routes layer can be found in the layers screen. If you tap it, it will be loaded or removed from the map.
Creating a layer from waypoints
Like with the routes, it is possible to create a new layer from your saved waypoints. Go to the waypoints screen (Menu > Waypoints). Then tap ‘More > Select’ to enter the selection screen. Select the desired waypoints and/or folders and tap in the bottom of the screen on the more icon. Then choose ‘Save as layer’.
A new pop-up will appear. Here you can choose the title of the waypoint layer. If you tap ‘Save’ in this pop-up the layer is created. All selected waypoints are copied into this layer.
The saved routes layer can be found in the layers screen. If you tap it, it will be loaded or removed from the map.